[Java] Intellij로 Angular + Spring Boot + Docker 구성하기 (1)
Intellij Enterprise 기능으로 Frontend/Backend를 구성해보자.
문득…이런 생각이 들었다…
Intellij를 사용하면서 Angular와 Spring boot를 같이 코딩하고 싶어졌다. Angular는 Visual Studio Code로, Spring Boot는 Intellij로 개발하니 내가 어떤 창에서 개발 중인지 헷갈렸다. 그런데 Intellij Ultimate는 Angular 개발을 지원했다. 그렇다면 바로 해봐야지.
Spring Boot Backend
2가지 단계로 구분했다. Intellij 에서 Spring Boot를 새로운 Module로 지정과 간단한 Rest API를 구성한다.
Spring Boot Project 생성
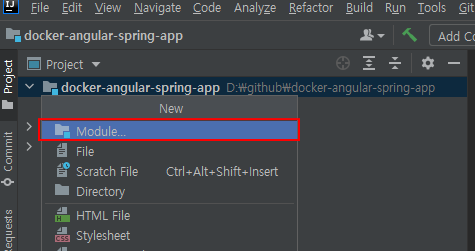
1. 새로운 Module 추가
Spring Initialzr를 사용해서 Spring Boot를 Module로 생성했다. 꼭 이게 아니라도 Maven, Gradle을 사용해도 상관없다.

2. 이름 및 JDK 설정.
간단히 backend 라는 이름과 JDK는 8을 선택했다. 나중에 Docker로도 올려보고 싶어서 8을 선택했다.

3. 종속성 설치
가벼운 Web 프로그램을 사용할 예정으로 아래와 같이 설정해주자.

Rest API Hello World
연결 Test를 위해서, 간단한 Hello world를 Text로 전달하는 예제다. Angular는 이 Rest를 호출할 예정이다.
package com.example.backend.controller;

import lombok.extern.slf4j.Slf4j;
import org.springframework.web.bind.annotation.GetMapping;
import org.springframework.web.bind.annotation.RestController;

@RestController
@Slf4j
public class TestController {

    @GetMapping(value = "/api/hello")
    public String helloWorld() {
        log.info("hello world is comming");
        return "hello world";
    }
}
Angular
크게 보면 3가지 단계다. 새로운 Module로서 Angular를 추가, Proxy 설정, 그리고 Hello world예제 소스 생성이다.
Angular 구성
1. Angular 모듈 구성
위 Spring Boot 구성과 동일하게 새로운 Module을 선택하자.

2. Angular 선택
이번에는 Javascript의 Angular를 선택하자.

3.이름 변경 & Finish
간단하게 frontend를 선택하고 종료. 이 때 프로젝트가 완성될 때까지 기다린다.

4.Proxy 설정
Angular의 ng serve(4200)와 Spring boot의 실행 Port(8080)는 다르다. /api로 시작하는 Angular의 요청은 Spring Boot에게 돌려주기 위해 localhost:8080/api로 변경해준다.

{
  "/api": {
    "target": "http://localhost:8080",
    "secure": false
  }
}
angular.json을 아래와 같이 수정한다.
...
"serve": {
  "builder": "@angular-devkit/build-angular:dev-server",
  "configurations": {
    "production": {
      "browserTarget": "frontend:build:production"
    },
    "development": {
      "browserTarget": "frontend:build:development",
      "proxyConfig": "proxy.conf.json"
    }
 },
....
hello world 소스 수정
단순한 버튼을 추가한다. 이 버튼은 Spring Boot에서 가져온 값을 alert으로 알려준다.
1. app.component.html
기존 소스는 모두 지우고 단순한 연동 테스트를 위해서 Button을 생성했다.
<button type="submit" (click)="clickHello()">hello world</button>
2. app.component.ts
앞서 html에서 작성한 clickHello()의 로직을 생성한다.
import {Component} from '@angular/core';
import {HttpClient} from "@angular/common/http";

@Component({
  selector: 'app-root',
  templateUrl: './app.component.html',
  styleUrls: ['./app.component.css']
})
export class AppComponent {
  title = 'frontend';

  constructor(private http: HttpClient) {
  }

  clickHello() {
    this.http.get("/api/hello", {responseType: "text"})
      .subscribe(data => {
        console.log(data);
        alert(data);
      }, error => {
        console.error(error);
      });
  }
}
결과
Button을 클릭하면 “hello world” 문구가 Alert창으로 나타난다. 다음 Post에서는 Docker로 연결해볼 예정이다.
 .
.